✦ Trusted Since 1935
Setup Alerts

Visa® Purchase Alerts
Enroll today to set up near real-time text and email alerts for transactions occurring on your TOPCU Debit Card or Credit Card, plus get access to transaction-blocking controls.
Opting in to Visa Purchase Alerts
- Access Visa Purchase Alerts website
- Follow prompts to add your TOPCU Debit or Credit Card.
- Select desired alerts and card control

Online Banking Alerts
You can set custom alerts to stay informed of your financial activity. Choose which alerts you get and how you receive them. Choose to receive your alerts by email, text, or in-app. You can receive notifications such as balance alerts, transaction activity, eStatements, account security notices, Bill Pay reminders, credit score updates, and more.

How to Manage Account Alerts and Notifications
Setting up account alerts and account notifications are a great way to stay up-to-date on your finances and account activity.
ONLINE BANKING INSTRUCTIONS:
Step 1: Log into your online banking account.
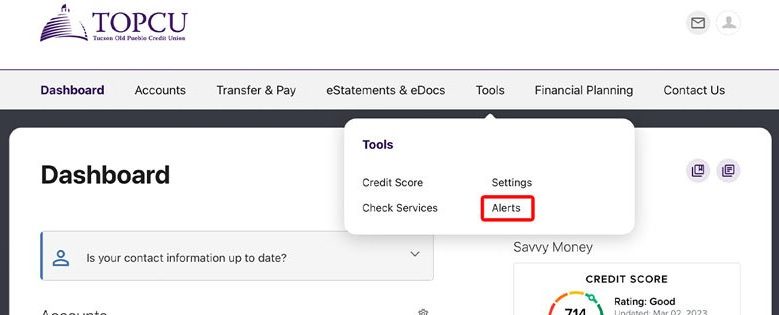
Step 2: Once in the dashboard, hover over the Tools menu at the top and then select Alerts.
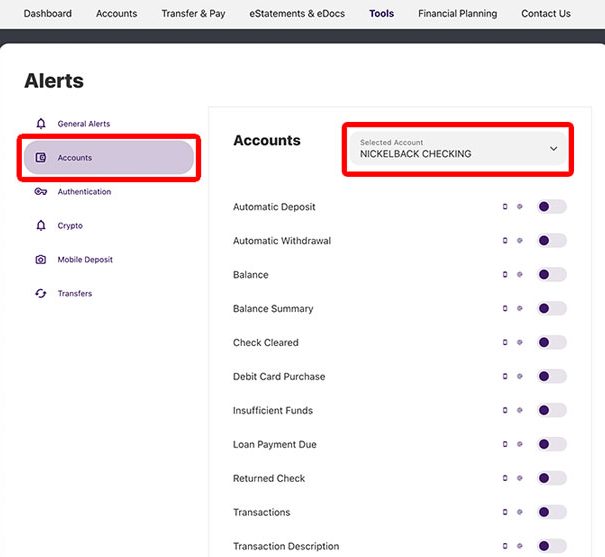
Step 3: From here, you’ll be taken to the Alerts widget where you can manage all of your alerts for your selected account. Select the Accounts tab from the menu on the left and choose your desired account from the dropdown.
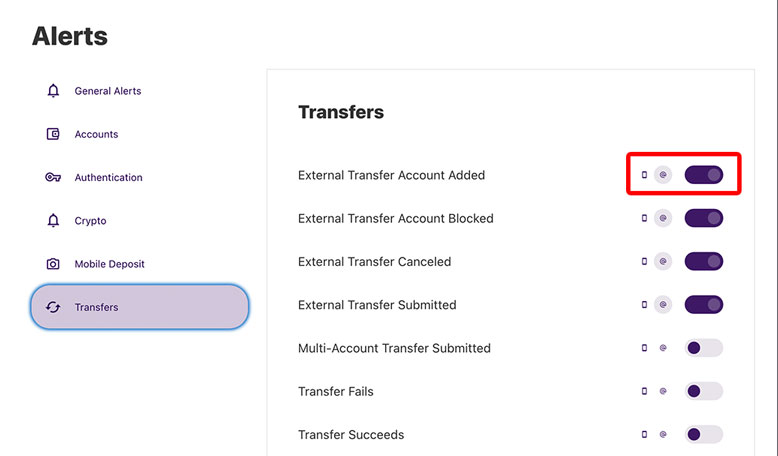
Step 4: Turn your desired notifications on by moving the on/off slider button. You can then select to receive email and/or push notifications. Then, save your changes. You’re all set!

MOBILE BANKING : INSTRUCTIONS
Step 1: Log into your account on the TOPCU App.
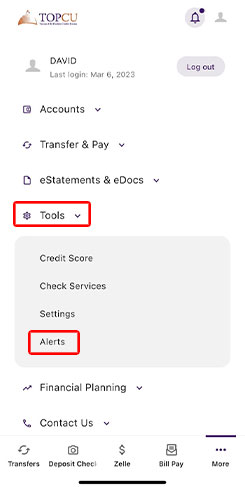
Step 2: Select More from the menu at the bottom of the screen.

Step 2: Select the Alerts option inside of the Tools Option.
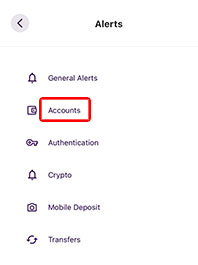
Step 3: Tap Accounts to manage all of your account alerts.
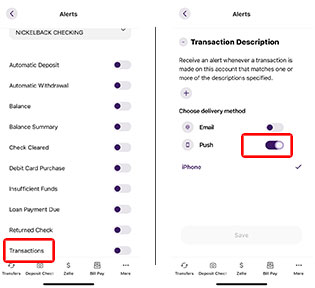
Step 3: After selecting your desired account, turn on a notification by choosing your desired alert then moving the on/off slider button. Then, select to receive email and/or push notifications. Lastly, save your changes.
Frequently asked questions (FAQ)
We understand that you may have some questions.
How do I use Zelle®?
To set up Zelle® Download the TOPCU Mobile App and click here for step-by-step instructions and Zelle® FAQ’s
Can I see my Credit Score?
-
The new TOPCU Digital Branch will offer rich credit reporting and credit management solutions with member score monitoring, credit utilization, and educational material. These solutions provide our members with powerful credit monitoring resources to assist in your financial wellness journey at no extra cost.
How do members access/unlock savvy money?
From the online dashboard click “unlock your credit score”
- Read the disclosure
- Click Continue
How to link an external account?
-
When you link an external account, you’re giving yourself access to view balances only, not to make transfers. These balances refresh each time you log in to online banking. Linking(s) an account allows you to view multiple balances in one place to simplify your banking experience.
Linking an external account
- Log in to online banking at topcu.org.
- From your Personal Overview dashboard, select Get Started, which is on the righthand side of the page below View External Accounts.
- Enter the name of your financial institution and select it.
- Input your user ID and password for the account you want to link. (Required fields may differ by financial institution. Additional information may be required.)
- Follow the on-screen directions to verify your account according to your financial institution. This may include answering security questions. Select the account you’d like to link.
Adding external accounts can be done both on the mobile app and online.
How to link external accounts using the topcu mobile app
- Open the new TOPCU Mobile
- Enter the Log in ID and password and click Log in.
- From the main dashboard scroll down and click Link and View External Accounts
- Click Get Started
- Review the information on the pop-up window and click Get Started
- Select the financial institution from the list or type in the name in the search field
- Review the information and click Confirm
- From the secured pop-up window enter your credentials and click Sign on
- Follow the steps as instructed by your financial institution
- Click Continue /Connect
- If you are done linking accounts, click Close
If you do not see your external accounts, follow the below steps
- Click the more option at the bottom right corner
- Click settings
- Click Snapshot
- Turn the Snapshot option to on position
- Click the back arrow
- Click Accounts
note: In some instances you may need to close and restart the app
How to add an external account for transfers?
To add an external account:
- From the main dashboard, select Transfers & Pay from the main menu, then choose Transfers.
- Select the Classic tab
- Click Add account to make a transfer.
- From the External Account section, choose to Add an account instantly or Add an account manually, then follow the on-screen directions.
Note: If you select Add an account manually, you will need your routing number and the account number and give the account a nickname that’ll help you identify it.
5. Choose a verification method (text, call or email) by which you’ll receive a verification code, then input the code as directed.
6. Monitor your external account for two small deposits from Grow, each under $1.00. This can take up to three business days. Once you receive the two deposits, make note of the exact dollar amounts.
7. Confirm your added account by logging back in to online banking and selecting Confirm from your home screen dashboard. You will be prompted to input the exact dollar amounts of the two trial deposits.
Once you complete the steps above, you’ll be able to transfer money in and out of the account, up to a daily maximum of $5,000, with no additional fees. For added convenience, you can even set up recurring, automatic transfers between your accounts or make direct payments on your loans using the external account as the payment method.
You can also add an external account using the TOPCU Mobile Banking app. To add an account using the mobile app, visit the More tab, select Transfer & Pay, select add an account, select Transfers External Account and continue following the remaining steps above.
How to Set Up Shared Access?
Shared Access
Shared Access lets you give other people permission to view and/or access to your account. You can control exactly what type of access you share by choosing certain from certain permissions. For example, you can choose to only allow a person to view the account, or you can allow them to make certain transactions. This is a good way to let a joint member, financial advisor, accountant or other designated person view your account using their own unique login credentials.
How to Set Up Shared Access
- Log in to your Online Banking profile and click on the drop-down menu, at the top right, next to your name.
- Click Settings.
- Click on the “Shared Access” tab, then click “Add a user.”
- On the “Add user” page, enter all of the requested information for the person you want to give access to your account. You’ll need to enter the person’s First Name, Last Name and Email Address. You’ll also need to enter the person’s email address a second time in the Confirm Email Address field.
- Under “Choose permissions,” select the accounts (shares) and level of access you want the person to have. Options include “View account” (see balances and transactions), “Transfer into” (add money from another account to the selected account), “Transfer from” (move money from the selected account to another account), and “Pay bills.”
If you want the person to have full access (able to do everything you can as the primary account holder), click “All permissions.” Once finished, scroll to the bottom of the page and hit “Save.”
- Once you click “Save,” a new window will pop up asking you to confirm and invite the added user. Review the permissions to make sure they are correct, and then check the box next to the statement “I acknowledge one or more of these settings selected will allow the invitee to transfer money from my account/accounts.” Note that this “acknowledgment” disclosure will appear regardless of whether or not you elected to give the person permission to transfer money from your account. Once finished, click “Confirm.”
- After clicking “Confirm,” you’ll be brought back to the main Shared Access page. You’ll see an “Invitation Pending” notice at the top of the screen. Click on the pending invite to open it up. You will see a 6-digit confirmation code at the top. You must provide this number to the person you have given account access to. They will need the confirmation code to complete their registration (see step 8). Keep in mind the code is only good for 24 hours, so the person must accept their invite and complete the registration process within that time frame.
- If you need to make any changes to access you have granted, you can also click on the pending invite and choose from “Edit user” (to change their name or email address), “Edit Account Access” (to change access permissions) or “Cancel Invitation” (to delete the shared access for this person).
- When the person you gave access to receives the email invite, instruct them to click on the unique link. From there, they’ll be directed to a page with three options: “Log In” with the existing TOPCU login info, “Register” for a login or “Sign in as guest.” Instruct the invited user to select the appropriate option based on their relationship with the credit union.
- On the next page, the invitee will be prompted to enter a Confirmation Code. This is the 6-digit code described in step 7 above, viewable from the “Shared Access” tab in your Online Banking account. You must personally give this code to the person you are granting access to. It will not be e-mailed to them.
In addition to entering the confirmation code, the person will need to fill in all the fields marked with the red asterisk, then click the “Continue” button at the bottom of the page. The system will then guide them through the rest of the process.
Can I see my Credit Score?
The new TOPCU Digital Branch will offer rich credit reporting and credit management solutions with member score monitoring, credit utilization, and educational material. These solutions provide our members with powerful credit monitoring resources to assist in your financial wellness journey at no extra cost.
How do members access/unlock savvy money?
From the online dashboard click “unlock your credit score”
- Read the disclosure
- Click Continue
What is tokenization?
Tokenization is the process of replacing a card number with a unique alternate card number, or “token.” Tokens can be used for mobile point-of-sale transactions or in-app purchases. A token is a numeric value that acts as a substitute for a card number, enabling each eligible device to have a unique token.
APPLE PAY, GOOGLE PAY, SAMSUNG PAY, FITBIT PAY, GARMIN PAY AND LG PAY
Is there a fee for this service?
No.
What if I am unable to activate my cards in the Digital Wallet?
If you are unable to activate you card in the Digital Wallet, please first verify if your device is compatible with this product. If your device is compatible and you are getting a message that says ‘Contact Your Financial Institution’ further verification is needed. Please contact us 520.881.6262
✦ All About Accessibility
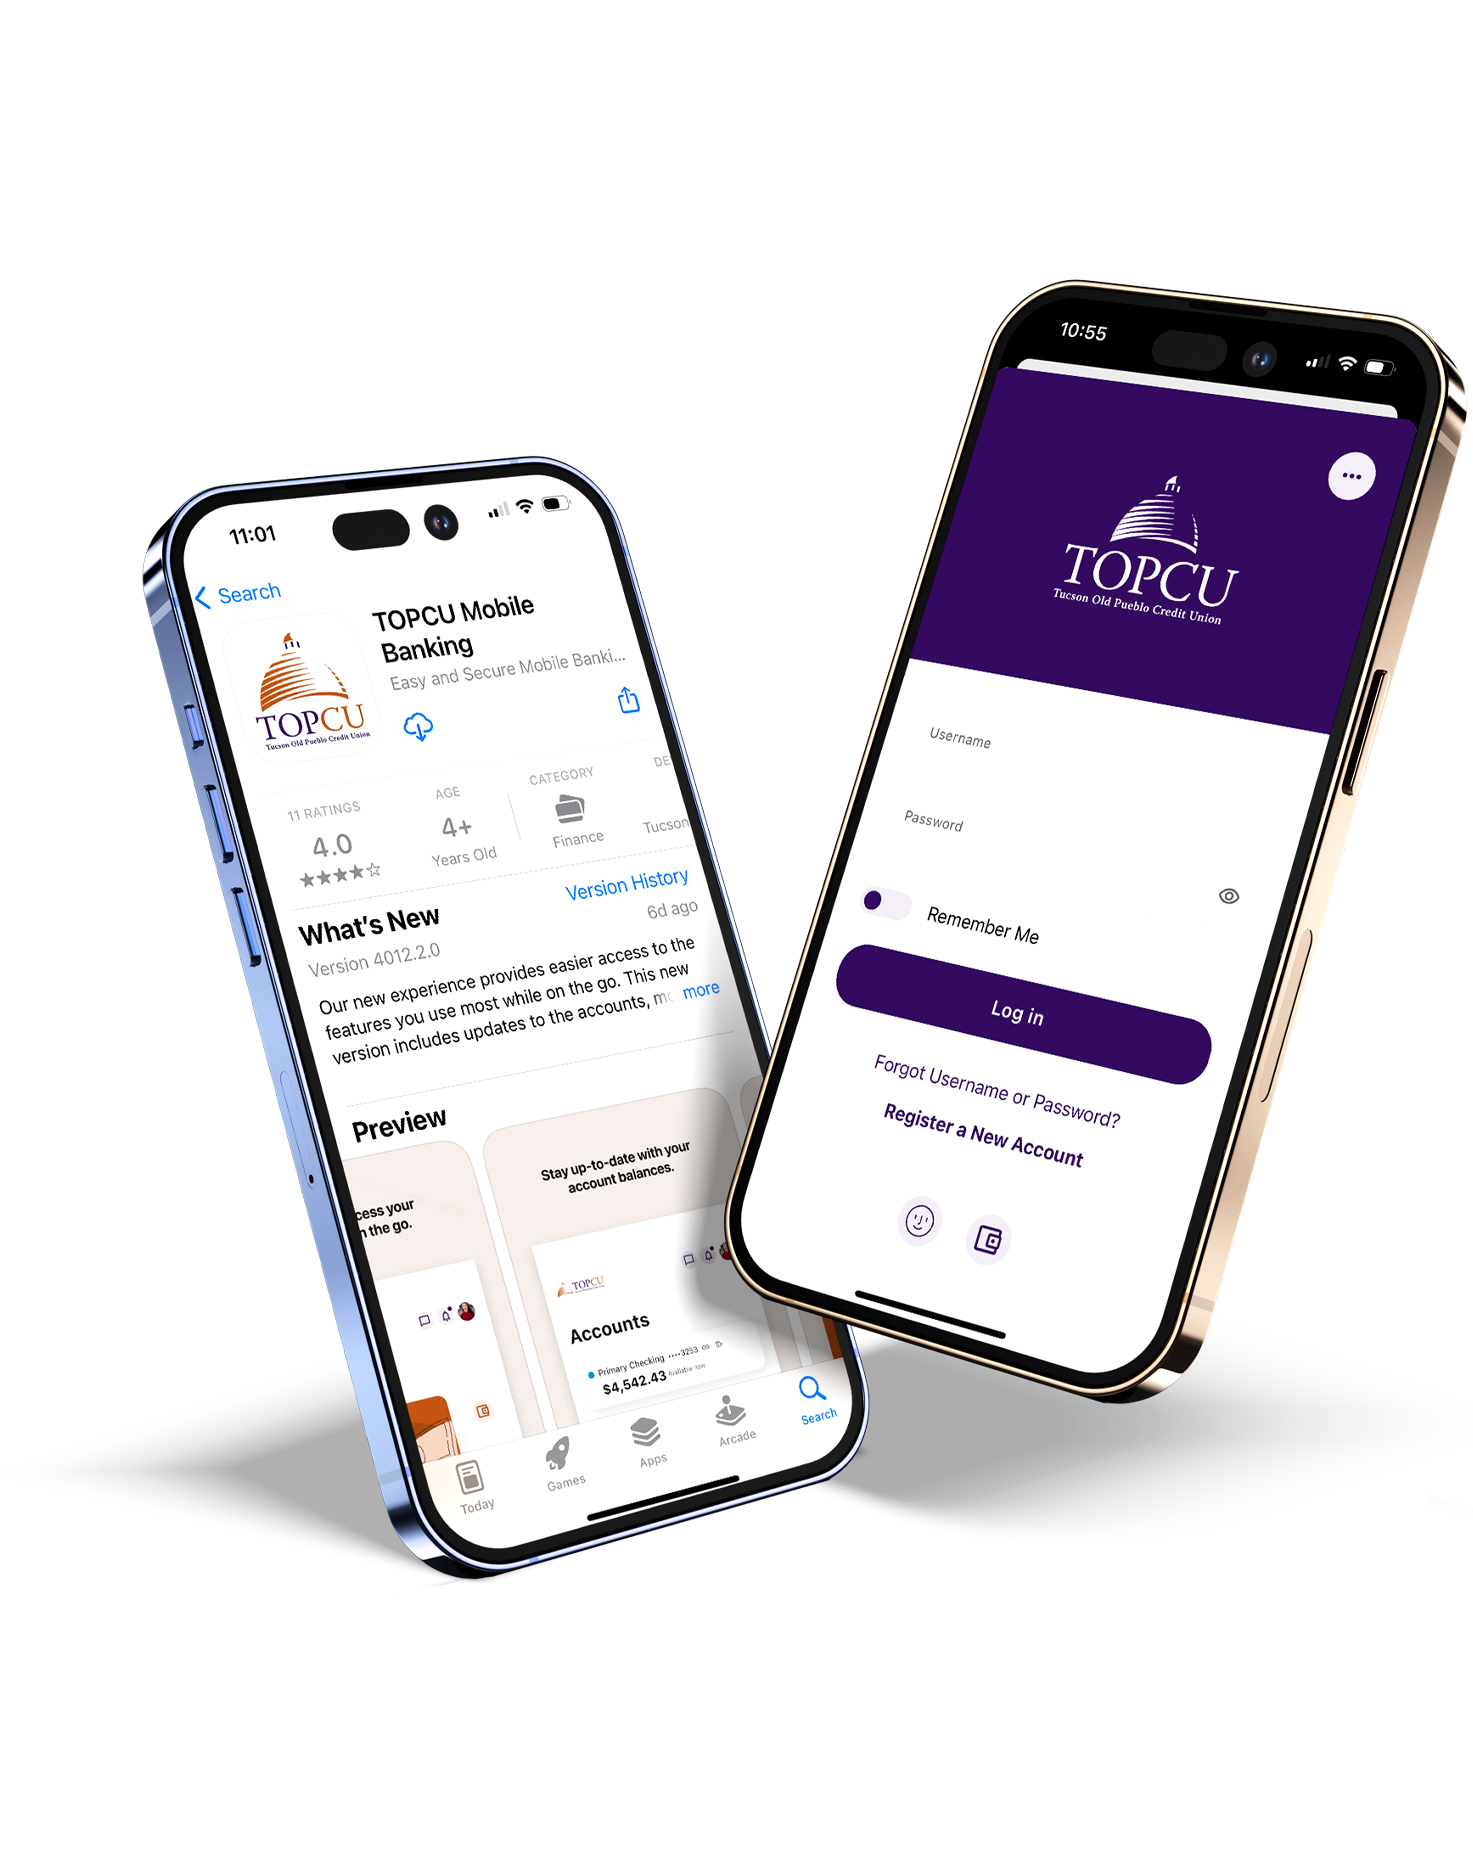
Revolutionize Your Banking with The TOPCU App
Check deposits, loan payments, and fund transfers are at your fingertips. Plus, get insights into your spending, access your credit score, and link all your external accounts for a full financial picture.
